The Raspberry Pi can do a lot of things that your PC can do – but it’s not designed to do everything. The Pi has an ARM processor, which means that it doesn’t have out-of-the-box support for programs designed for computers with x86 processors. That’s a bummer, because x86 is Intel’s processor infrastructure – the one you’d find on PCs, and the one you’d need to run Windows programs. The good news, though, is that there’s a way around this. By using ExaGear, a paid program, we can emulate an x86 environment and run Windows applications like Skype, Spotify, and uTorrent. The folks at ExaGear were kind enough to send us a free product key. Here’s how we put it to use.
How to run x86 programs on the Raspberry Pi
For this project, you’ll need your Raspberry Pi and standard peripherals (a power source, monitor, keyboard, and mouse), plus a microSD card (bigger is better, as ExaGear and the programs we’ll want to use will take up space – try to get at least 16 GB) and an ExaGear license.
Step 1: Install Raspbian
You know how to do this, because we’ve showed you how to install Raspbian on the Raspberry Pi before. Go ahead and get that done, then meet us in the next step.
Step 2: Enable the KMS GL driver
Hop into the terminal on Raspbian and enter this line:
sudo raspi-congfig
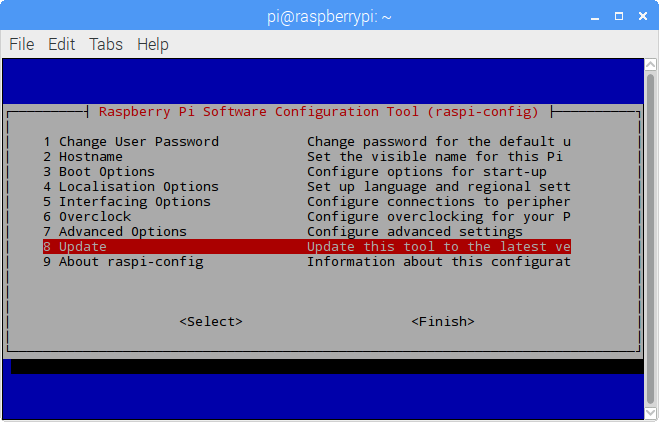
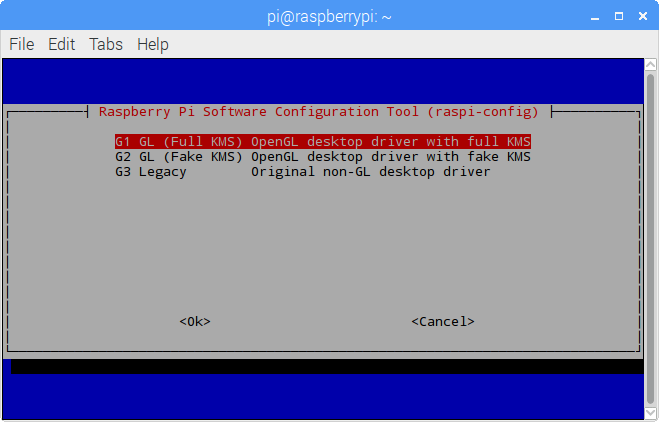
This should turn your terminal window into a blue field with a gray menu in it. Select Update – Update this tool to the latest version. Let that play out, then hit Advanced Options > GL Driver > GL (Full KMS) OpenGL desktop driver with full KMS. You should get a pop-up letting you know that “Full KMS GL driver is enabled.” Hit OK, then Finish. You’ll be prompted to reboot. Say Yes.
Step 3: Download ExaGear
Alright, time for ExaGear! ExaGear is what makes this all possible – it will emulate an x86 environment on the Raspberry Pi. First, you’ll need an ExaGear product key, because this program isn’t free (except for us, sorry).
Save your ExaGear product key to your Downloads directory on your Pi (the key needs to be in the same directory as ExaGear, and ExaGear is going here, so Downloads is the easy choice).
Let’s go get ExaGear. To the terminal!
cd Downloads
wget http://downloads.eltechs.com/exagear-desktop-v-2-1/exagear-desktop-rpi3.tar.gz
Be prepared to wait 10 minutes or so for that to download, especially if you’re relying on Wi-Fi. Then unzip that compressed file.
tar -xvzpf exagear-desktop-rpi3.tar.gz
Step 4: Install ExaGear
Staying right there in the command line, run this:
sudo ./install-exagear.sh
There you go – ExaGear will install a guest x86 image – one of its choice, based on your hardware. You can force it to choose Ubuntu, though, by saying this:
sudo ./install-exagear.sh ubuntu-1404
…instead of the first option we gave you in this step. Why Ubuntu? It runs Spotify, so Spotify super-fans will want to go with this route.
Step 5: Enter the guest x86 image
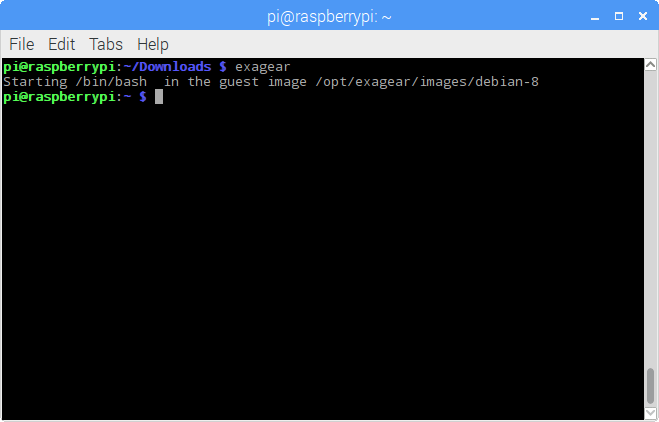
So that’s it for installing ExaGear – but your Pi won’t run the x86 image until you tell it to. You can tell it to do so in the terminal with this command:
exagear
x86 repositories are now available to you! And that includes Wine, the program that will let you run Windows programs on x86 Linux machines. Let’s go ahead and get that:
sudo apt-get install wine
For more on Wine and getting your actual Windows programs, check out WineHQ.
Once you’ve used the exagear command, you’ll be in an guest x86 session until you exit with (what else):
exit
And that’s it! With a very simple setup process, ExaGear will allow you to run x86 programs on the Raspberry Pi – including Windows applications, which can be run with the help of Wine.

Is this a 64-bit or 32-bit environment?
If it’s only 32-bit (i386), then you can achieve the same thing with QEMU and a chroot environment, WITHOUT buying a license for ExaGear. If it’s 64-bit, however, then they’ve actually achieved something unique. AMD64 QEMU is currently way too broken to run a stable chroot.
Edit: Looked it up and ExaGear is only 32-bit; the same thing can be achieved for free using debootstrap/binfmt/QEMU/chroot.
Step 1: Run this command
#
apt-get update && apt-get install qemu qemu-user qemu-user-static binfmt-support debootstrap binutils
Step 2: Create a folder for your chroot.
Tip: Use mount –bind for proper df support within the environment (optional)
#
mkdir /chroot
mkdir /tmp/mnt/
mount –bind /chroot /tmp/mnt/
Step 3: Run debootstrap in the chroot dir. This can be done with Debian or Ubuntu, but for this tutorial I’ll be using Debian.
#
cd /tmp/mnt/
debootstrap –foreign –arch i386 sid ./ http://httpredir.debian.org/debian
Step 4: The previous step only ran the first half of debootstrap. Now we need to mount a few basic directories and copy the static version of qemu-i386 into the environment. Run the following:
#
mount -t sysfs sys sys/
mount -t proc proc proc/
mount –bind /dev dev/
mount –bind /dev/pts dev/pts/
mount –bind /dev/shm dev/shm/
cp /usr/bin/qemu-i386-static usr/bin/
Step 5: Now we execute the chroot for the first time and run the second half of debootstrap.
#
chroot . /debootstrap/debootstrap –second-stage
Step 6: The environment is complete! Now we enter the environment.
#
chroot ./ /bin/bash –login -i
Tips:
A few environment variables may be set wrong when first entering the environment. You can fix it with the following:
#
export LANGUAGE=”C”
export LC_ALL=”C”
unset HOME
export HOME=/root/
source ~/.bashrc
source ~/.profile
The easiest way to do this so you don’t have to set those variables every time you chroot in is to install an SSH server and configure it to an alternate port than the main one Raspbian is running. That way OpenSSH will set up your environment variables automatically. If you go that route then your initial command should be:
chroot ./ /usr/sbin/sshd
Then just SSH localhost with the alternate port. Keep in mind you’ll need to change a couple variables in sshd_config besides the port, such as permit root login and x11 forwarding. If set up properly you should be able to connect to your environment + run graphical applications with
#
ssh -xY root@localhost -p myportnumber
You will have to remount the chroot + special directories on every reboot. You can do this manually every time or make things easier by creating a script.
To make the script:
#
nano /usr/bin/chrootmount
This will open nano and tell it to create a file in /usr/bin. Now enter the following into the script:
#!/bin/bash
mkdir /tmp/mnt/
mount –bind /chroot /tmp/mnt/
mount -t sysfs sys /tmp/mnt/sys/
mount -t proc proc /tmp/mnt/proc/
mount –bind /dev /tmp/mnt/dev/
mount –bind /dev/pts /tmp/mnt/dev/pts/
mount –bind /dev/shm /tmp/mnt/dev/shm/
chroot /tmp/mnt/ /usr/sbin/sshd
Now save the script (Ctrl+X, Y) and chmod it to 755 so it’s executable after that you should be able to mount your chroot + run your SSH server on boot by just running chrootmount.
If you created the script in the previous tip and want to make it even easier by having it run automatically on boot, we can do this with a systemd service.
#
nano /etc/systemd/system/chrootmount.service
This will open nano once more. Now add the following:
[Unit]
Description = mounts chroot on boot
[Service]
Type=one-shot
ExecStart=/usr/bin/chrootmount
[Install]
WantedBy=multi-user.target
Save the script (Ctrl+X, Y) and enable it with
#
systemctl enable chrootmount.service
Now the system will automatically execute the chroot mount process + run the ssh server on every boot. So on boot you’ll be able to access your environment by just opening terminal and typing:
ssh -xY root@localhost -p myportnumber
If you want to access your main filesystem from within the environment, you’ll need to bind mount it. Add this to your chrootmount script:
mkdir /tmp/mnt/mainfs
mount –bind / /tmp/mnt/mainfs/
Enjoy your free x86 support on the RPi!
Thanks a lot, Mitchell!
No problem 🙂
One small edit by the way: thanks to my autocorrect the type in the systemd service is wrong.
It should be oneshot all one word, not one-shot
Hi Mitchell, where am I wrong? I’m using Stretch but I can’t run x86 ssh and I get errors with the mount command.
Apologies for the month-late reply.
Did you set your x86 ssh server to run on a different port from your host server?
Also, what output do you get in the terminal when you try to run it?
Edit:
Also, what errors are you getting with the mount command?
I’m trying to mount, but I can’t:
pi@raspberrypi:~ $ mount –bind /chroot /tmp/mnt/
Usage:
mount [-lhV]
mount -a [options]
mount [options] [–source] | [–target]
(…)
It’s two -‘s on the bind command, not one. The font on this site makes it look like a singular dash unfortunately.
The difference being here, Exagear is very optimized and much faster than qemu-i386.
I’ve been using qemu-i386 on ARM since the late 2000’s and last used it on a Nokia N900, of course it worked fine, but my curiosity spiked to try Exagear and the speed difference is noticeable.
At command sudo chroot . /debootstrap/debootstrap –second-stage:
I: Keyring file not available at /usr/share/keyrings/debian-archive-keyring.gpg; switching to https mirror https://deb.debian.org/debian
I: Installing core packages…
W: Failure trying to run: dpkg –force-depends –install /var/cache/apt/archives/base-passwd_3.5.44_i386.deb
W: See //debootstrap/debootstrap.log for details
Please help.
You can not actually achieve the same thing with QEMU because ExaGear is much more faster. ExaGear gives 80% of native speed.
Does this work on RetroPie like it does on Raspbian? Because I would love to have some Game Cube games on my arcade machine.