In the past, we’ve showed you how to set up an FTP server on a Raspberry Pi. Now we’re going to show you how to do something very similar: use SSH (Secure Shell) to access your Raspberry Pi from other devices.
SSH is a secure network protocol. With an SSH connection, you can access your Raspberry Pi remotely from another device – whether that be a Mac, PC, or smartphone. Remote access to your Raspberry Pi is especially handy if your Pi is acting as a web server – or as any kind of server, for that matter.
How to SSH into the Raspberry Pi
Step 1: Enable SSH
As you might remember from our FTP server how-to, the first thing we need to do is make sure that SSH is enabled on your Raspberry Pi. This can be done two ways: using the GUI or using Terminal. Which method you use is entirely up to you! We’ll cover both below.
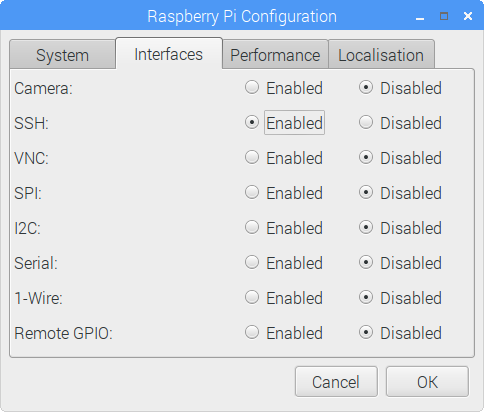
Using the GUI
Head over to Preferences > Raspberry Pi Configuration and click on “Interfaces.” While there, select “SSH: Enabled.”
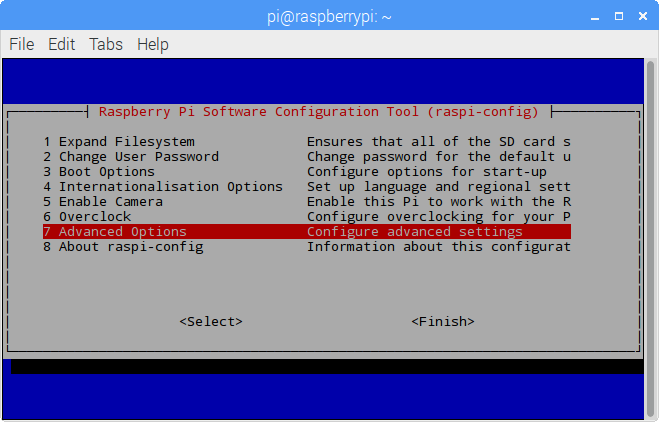
Using Terminal
Open Terminal and enter this command:
sudo raspi-config
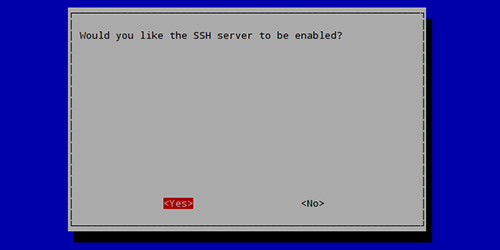
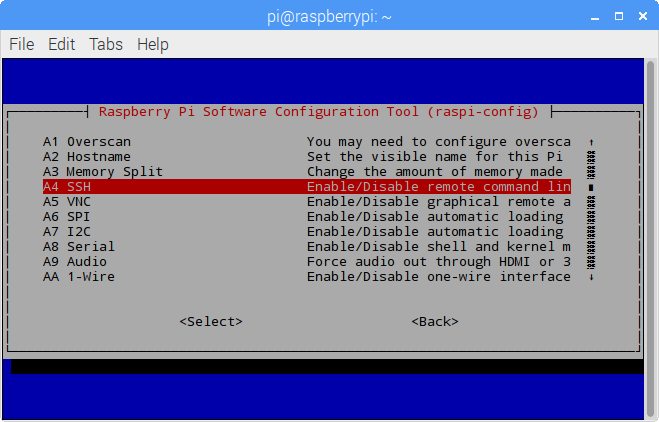
Then head over to Advanced Options and select SSH. You are asked whether you would like the SSH server to be enabled. Select “Yes.”
Now the SSH server is enabled and you can exit the config.
Step 2: Determine your IP address
In order to connect to your Raspberry Pi, you have to know your Raspberry Pi’s IP address. If you’re going to connect to your Raspberry Pi from inside your home network, open Terminal and enter this command:
hostname -I
If you want to connect to your Pi from outside of your home network, you will have to set up port forwarding and determine your public IP address instead.
Obtaining your public IP address is very easy. Just head to a search engine – like DuckDuckGo, the default search engine on Raspbian – and type “what is my IP address.” Hit search and your search engine of choice should provide your answer. You IP address will be in this format: ###.###.###.### – where each # is a digit, of course.
Whether you want to connect on your home network (with a private IP address) or from outside your network (with the public IP address), you’re going to need to remember the digits, so write your IP address down!
Step 3: SSH into your Raspberry Pi
Windows
To connect to your Raspberry Pi with SSH, you’ll need a popular program called PuTTY. In the words of its creator, PuTTY is “a free implementation of SSH and Telnet for Windows and Unix platforms.” You can download PuTTY here. Just choose putty.exe’s 32 bit or 64 bit version, depending on which version of Windows you have.
Once you’ve finished downloading, go ahead and launch putty.exe. You’ll be greeted with a screen like this:
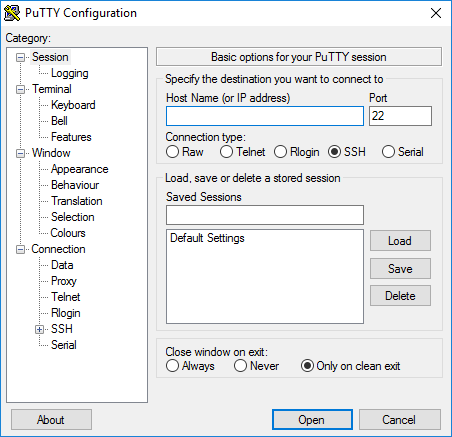
See the “Host Name (or IP address)” field? That’s where you’ll want to enter your Raspberry Pi’s IP address as determined in the previous step.
Make sure that the “Port” field has a value of “22.”
Now, click “Open.”
You’ll get a security alert next – go ahead and hit “Yes” on that.
Finally, log in to your Raspberry Pi. If you haven’t changed the defaults, your username will be “pi” and your password will be “raspberry”.
You are now connected to your Pi and can control the device remotely with Linux commands. If you don’t know much about Linux commands, here’s a comprehensive list.
Mac OS X
Establishing an SSH connection to the Raspberry Pi on Mac OS X is very straightforward, since the operating systems comes with Terminal installed. You just have to open Terminal and enter this command:
ssh pi@###.###.###.###
(###.###.###.### here represents your IP address, of course.)
After issuing the command, you’ll be prompted with a security alert. Type “yes” to continue.
Log in to your Raspberry Pi. If you’ve left the defaults unchanged, the username will be “pi” and the password will be “raspberry”.
You are now connected to your Pi and can control the device remotely with Linux commands. As mentioned in the Windows section, you can find a comprehensive list of Linux commands here.
Troubleshooting
If you can’t establish an SSH connection to your Raspberry Pi, here are a couple of things you can do:
- Make sure that you have enabled SSH on your Raspberry Pi
- Make sure that you’re using the correct IP address
- Make sure that you have the correct credentials
- If you’re connecting from outside of your home network, make sure that you have set up port forwarding
If you still have problems in connecting, please post a comment below.

Hi,
Thanks for the tutorial. Despite having SSH enabled on my Pi, and being able to ping my Pi from my laptop, I get an “Operation timed out” error when trying to SSH in from my laptop. Any idea why this may be?
I have followed very similar steps from many different websites, but I keep getting the same “time out” error. I have not been successful in logging into my Raspberry Pi 3 for the first time using PuTTY. What did you mean by setting up a port forwarding? Maybe this is something I need to do.