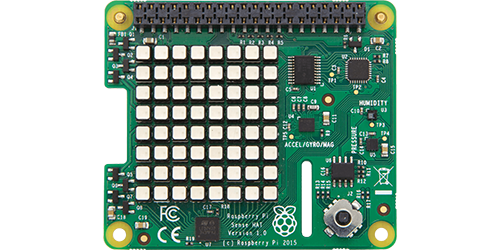
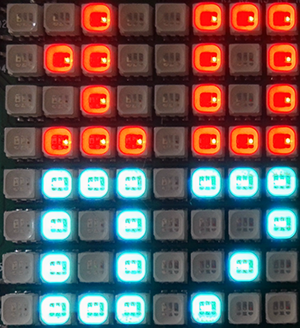
The Raspberry Pi can do an awful lot right out of the box – but it can do even more with the help of the Sense HAT, an add-on developed for the Astro Pi project. Astro Pi sent augmented Pis into space, and the Sense HAT provided most of the new functionality used on the mission. Among that new functionality? A small LED matrix, which just so happens to be perfect for use as a digital clock display. Check it out:
Pretty cool, right? And you can make one, too, with the help of these instructions. You’ll just need the usual stuff (a Raspberry Pi, microSD card, etc.) plus the Sense HAT.
How to create a Raspberry Pi digital clock using the Sense HAT
This project is extremely easy, and it’s a great introduction to the Sense HAT and the cool things that it can help your Pi do. All we’re going to do here is install Raspbian and, after checking to make sure we have the Sense HAT library, create a Python file based on the hard work of a GitHub user that goes by SteveAmor. Then we’ll just run that Python file and enjoy our new digital clock. Easy, right? Let’s get started.
Step 1: Install and update Raspbian
Like so many other projects, this one starts with Raspbian. Install Raspbian, then open Terminal and run the following commands:
sudo apt-get update
sudo apt-get upgrade
Step 2: Check to make sure you have the Sense HAT library
The Sense HAT library should be installed already, but it’s always good to check:
sudo apt-get install sense-hat
If you see a message that says “sense-hat is already the newest version,” you’re all set. Let’s move on.
Step 3: Create a new Python file
We’re going to create a new Python file:
nano clock.py
…with the following contents. This is long. Are you ready?
from sense_hat import SenseHat
import time

sense = SenseHat()

number = [
0,1,1,1, # Zero
0,1,0,1,
0,1,0,1,
0,1,1,1,
0,0,1,0, # One
0,1,1,0,
0,0,1,0,
0,1,1,1,
0,1,1,1, # Two
0,0,1,1,
0,1,1,0,
0,1,1,1,
0,1,1,1, # Three
0,0,1,1,
0,0,1,1,
0,1,1,1,
0,1,0,1, # Four
0,1,1,1,
0,0,0,1,
0,0,0,1,
0,1,1,1, # Five
0,1,1,0,
0,0,1,1,
0,1,1,1,
0,1,0,0, # Six
0,1,1,1,
0,1,0,1,
0,1,1,1,
0,1,1,1, # Seven
0,0,0,1,
0,0,1,0,
0,1,0,0,
0,1,1,1, # Eight
0,1,1,1,
0,1,1,1,
0,1,1,1,
0,1,1,1, # Nine
0,1,0,1,
0,1,1,1,
0,0,0,1
]

hour_color = [255,0,0] # Red
minute_color = [0,255,255] # Cyan
empty = [0,0,0] # Black

clock_image = [
0,0,0,0,0,0,0,0,
0,0,0,0,0,0,0,0,
0,0,0,0,0,0,0,0,
0,0,0,0,0,0,0,0,
0,0,0,0,0,0,0,0,
0,0,0,0,0,0,0,0,
0,0,0,0,0,0,0,0,
0,0,0,0,0,0,0,0
]

while True:
    hour = time.localtime().tm_hour
    minute = time.localtime().tm_min

    # Map digits to the clock_image array
    pixel_offset = 0
    index = 0
    for index_loop in range(0, 4):
        for counter_loop in range(0, 4):
            if (hour >= 10):
                clock_image[index] = number[int(hour/10)*16+pixel_offset]
            clock_image[index+4] = number[int(hour%10)*16+pixel_offset]
            clock_image[index+32] = number[int(minute/10)*16+pixel_offset]
            clock_image[index+36] = number[int(minute%10)*16+pixel_offset]
            pixel_offset = pixel_offset + 1
            index = index + 1
        index = index + 4

    # Color the hours and minutes
    for index in range(0, 64):
        if (clock_image[index]):
            if index < 32:
                clock_image[index] = hour_color
            else:
                clock_image[index] = minute_color
        else:
            clock_image[index] = empty

    # Display the time
    sense.low_light = True # Optional
    sense.set_pixels(clock_image)
    time.sleep(1)
Phew, got all of that?
Step 4: Start the clock
We can now start our clock by running the command:
python3 clock.py
Your clock will keep right on running until you exit, which you can do with Ctrl+C.
Yes, it’s really that easy: you have created your very own digital clock using the Raspberry Pi and the Sense HAT! Part of the reason that this project is so easy is that it relies heavily on GitHub user SteveAmor’s code. So a big thanks to SteveAmor, and please do check out SteveAmor’s original post over at GitHub.
You can put your new digital clock anywhere, because it doesn’t require a monitor or a screen – it uses the Sense HAT’s LED matrix. In fact, you can do pretty much this whole project without a dedicated screen if you decide to SSH into your Raspberry Pi. This is a great project to use with a dedicated Pi and to combine with other simple home utility and smart home projects.
And if you enjoyed this project and want to use your Sense HAT on other projects, good news – we’ve covered some fun Sense HAT DIY projects in the past. A similarly simple Sense HAT project will turn your Raspberry Pi into a smart home weather station that posts your home’s temperature, pressure, and humidity online so that you can keep tabs on it from anywhere. Click that link for the complete guide!

Be the first to comment on "How to create a Raspberry Pi digital clock using the Sense HAT"