For about a year of my life, I played too much Minecraft. Way too much Minecraft. I was playing it every day, sometimes for hours straight. So I present this project to you with a word of warning. If you or a loved one is addicted to Minecraft, please seek help. You can conquer your dependence on Minecraft and go on to live a fulfilling life of moderation, in which you only occasionally play Minecraft on your phone or your computer. That’s the life we all aspire to, I think. Anyway, this project is perfect for casual Minecraft play, because it turns your Raspberry Pi into a low-powered Minecraft server. Here’s how to set up a Minecraft Pocket Edition server on the Raspberry Pi.
How to set up a Minecraft Pocket Edition server on the Raspberry Pi
In this project, we’re going to turn the tiny Raspberry Pi into a server for online Minecraft play. I’m always amazed by what the tiny Raspberry Pi can do, but make no mistake, this is a project that pushes the little guy to his limits. So don’t expect to play with a ton of people on this server, and be aware that you have have some performance issues. This isn’t a server for you and eight hyper-competitive friends in survival mode – it’s probably better for creative projects and small family servers for your kids. With that said, the process of setting up our little server is pretty straightforward.
We’ll start with Raspbian Lite because, again, this project is going to be pretty taxing for your Pi, and you’ll want to avoid any unnecessary installs. We’ll then install Nukkit, a server program that works well for this project. After a few minor tweaks, we’ll be ready to connect to our new server on a device running Minecraft Pocket Edition. That’s it! Ready to get started?
Step 1: Install Raspbian Lite
You’ll want Raspbian Lite rather than regular Raspbian, because we want as little on this Raspberry Pi as possible when we ask it to do the heavy lifting required to run a server. For the same reason, I recommend a fresh install. Check out our guide to installing Raspbian on the Raspberry Pi for more instructions (agin, just remember to make sure you’re installing the Lite version).
Step 2: Check for updates
Yeah, we always do this. Your login is username pi and password raspberry. Raspbian Lite will boot to the command line. Run these commands:
sudo apt-get update
sudo apt-get upgrade
Great! Easy! Let’s move on.
Step 3: Update your Raspberry Pi’s memory split
We want as much memory as possible available to our server so that our poor little Pi can handle its work. So enter the raspi-config menu with this command:
sudo raspi-config
…and navigate to Advanced Options > Memory Split. Set the Memory Split option to 16.
Now go ahead and hit Finish and give your Pi permission to reboot.
Step 4: Install Java
We need Java to run Nukkit. Java works out of the box on Raspbian, but since we’re using Raspbian Lite, we need to download and install it:
sudo apt-get install oracle-java8-jdk
Step 5: Download Nukkit
Nukkit is the program that we’ll use to run our Minecraft server. It’s a great program, works well on the Pi, and is super easy to use. Before we download it, let’s create a new directory so that we can find this darn thing again after we download it!
mkdir nukkit
cd nukkit
We’ve made a new folder and entered it, so let’s go ahead and download Nukkit to this director.
wget -O nukkit.jar http://ci.mengcraft.com:8080/job/nukkit/lastSuccessfulBuild/artifact/target/nukkit-1.0-SNAPSHOT.jar
Step 6: Run Nukkit
Let’s go ahead and run our brand new server program!
sudo java -jar nukkit.jar
You’ll be able to choose your language from a list of options preceded by “[INFO].” Type the indicated three-letter code and hit enter to choose a language. If you’re enjoying this article, I’d recommend English. But hey, it’s up to you.
Now you’ll get a few lines of information preceded by that same [INFO] tag. If you did it right, you’ll see lines like “preparing level ‘world'” and, hopefully, “Done!” with some information about how long the game took to start.
By default, your server will be a survival server. I’ll show you how to tweak that in the final section.
Step 7: Connect to the server
Okay, let’s play! Grab your phone, tablet, or whatever else you’re running Minecraft Pocket Edition on, and fire that bad boy up. Make sure you’re on the same Wi-Fi network as your server. Now hit play and head to the Friends tab. Your server should appear under LAN Games. Here’s what mine looked like on my iPhone (it’s labeled, by default, as Nukkit Server For Minecraft: PE).
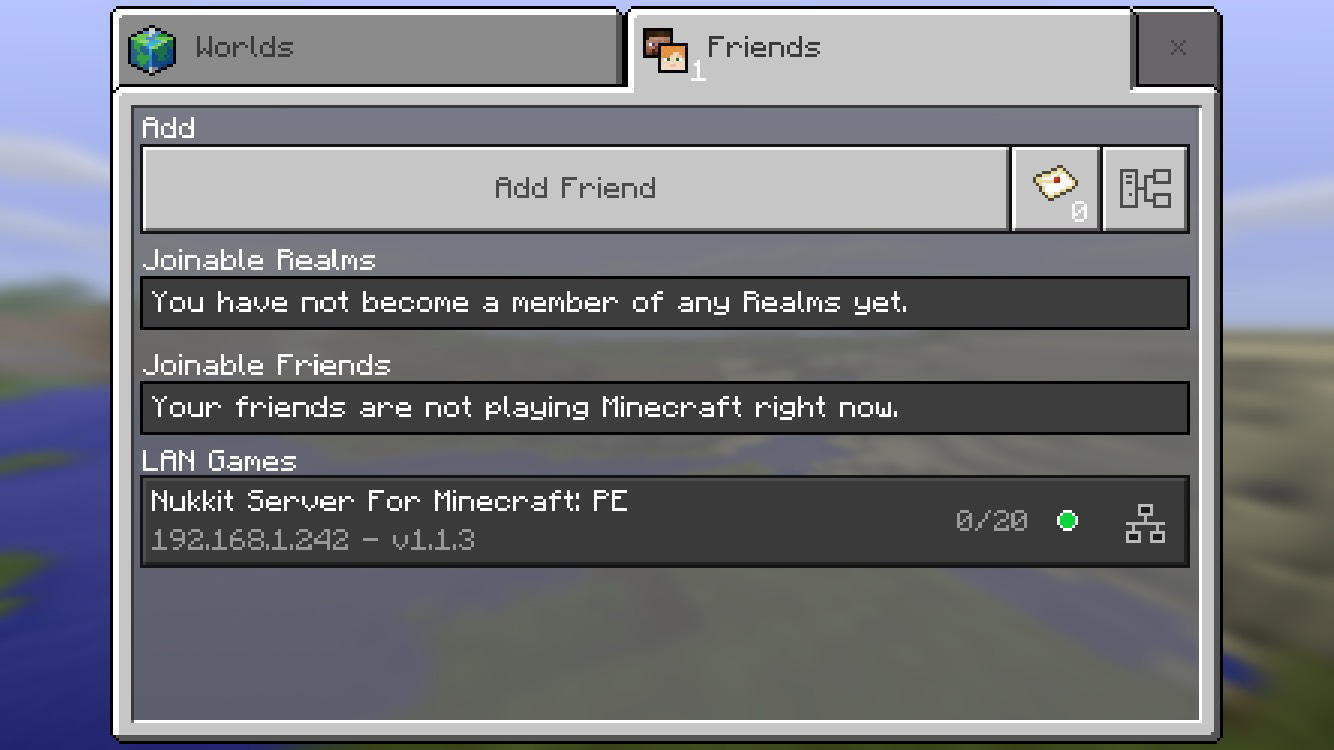
If for some reason it doesn’t, you’re not out of luck yet. You can still hit that button in the upper right corner with the rectangle connected to the two squares. That’s the direct connect button, and it will let you enter the IP address of your server. You can figure out your Pi’s IP address in the command line with the command hostname -I (that’s a capital I).
Step 7: Configuring your server, making it available on the internet, and more (optional)
If you’re content with the server’s default settings, you’re good to go! If not, here are a few ways to tweak the experience.
Edit server.properties: You can do all kinds of stuff by tweaking the server.properties file. Here’s the command you’ll need to edit the file: sudo nano server.properties. Minecraft’s Gamepedia page has the details on all the things you can change, so I’ll let you click the link for the details and will just briefly mention two important settings: gamemode starts at 0 (survival) and can be changed to 1 for creative, and difficulty starts at 1 (easy) and can be raised as high as 3 or lowered to 0 for peaceful.
Edit Nukkit’s configuration file: Nukkit has a config file of its own, too. Most of your game-related options are in the other one, but you can tweak things like the number of chunks loaded in this file, which can be reached with the command sudo nano nukkit.yml.
Access your server online: These instructions have given you a local server, but you can make this an online server if you so desire. You’ll just need to set up port forwarding on your router. Grab a computer and access your router’s settings page by typing in your router’s IP address (it’s probably on the router, and you can always use Google to track down your router brand’s default IP). Forward port 19132 (that port number comes from server.properties) to your Pi’s local IP address. If you do this, you should be able to enter your public IP to connect to your server from outside of your local network.
Activate SSH: You may find it easier to control your server from a computer via SSH – that way, you don’t have to leave a monitor and keyboard and all that connected to your Pi the whole time. You can allow SSH in the raspi-config menu (Advanced Options > SSH). For more on how to SSH into your Raspberry Pi, check out our article titled (what else?) How to SSH into the Raspberry Pi.
Nice write up and I got it running in less than an hour.
One thing I notice is that sometimes when hitting a tree or digging, the object will disappear and then suddenly the object will reappear. Any thoughts about that?
Also, the server.properties options use on/off while in the Minecraft’s Gamepedia page they use true/false. Any ideas which is correct?
Hello,
I seem to be stuck on Step 5 when I try to install Nukkit and do the following:
“We’ve made a new folder and entered it, so let’s go ahead and download Nukkit to this director.
wget -O nukkit.jar http://ci.mengcraft.com:8080/job/nukkit/lastSuccessfulBuild/artifact/target/nukkit-1.0-SNAPSHOT.jar”
I get nothing. Please help.
Thank you in advance.
I finally got it, and by the way this is a great article.
Thanks.
Once you have Nukkit running you can add the Pokkit plugin that lets you install plugins written for Bukkit and Spigot (full fat Minecraft servers). One of these is RaspberryJuice which allows you to code with the same python API as the version of Minecraft that comes with the Pi.
When I try to connect to my server, it says outdated client.
Can anyone help me?
Outdated Client? Same here. I run MCPE Client v1.2.0 on a iPad. But the Nukkit version supports v1.1.3 I believe. Would be nice to find an server version update on http://ci.mengcraft.com:8080/job/nukkit/ but up until now there isn’t any.
Outdated client error.
Is there any other server we can install to bypass this error ?
Can anyone help with getting animals and mobs to spawn? I used these steps and I’ve tried adjusting server properties and nukkit.yml. Am I missing something or something additional I need to do?
The download link in this post is outdated. Latest build can be found at:
https://ci.nukkitx.com/job/NukkitX/job/master/lastSuccessfulBuild/artifact/target/nukkit-1.0-SNAPSHOT.jar
URL has changed:
https://ci.nukkitx.com/job/NukkitX/job/Nukkit/job/master/
I was able to get Java 8 installed and installed the newest Nukkit with Minecraft PE 1.2.13. However when I load the .jar file I see and alert that says “No level called “nether” found! Nether functionality will be disabled.” Has anyone ran into this one too?