VLC media player is one of the best options available for playing videos and more. And people know it: a whopping 72% of respondents to a poll run by Lifehacker called VLC the best video player available.
VLC media player is available for many operating systems, including Windows, OS X, and Linux. Because Raspbian – the popular Raspberry Pi operating system – is based on Debian, one of the earliest Linux distributions, Raspberry Pi users can easily install VLC by opening Terminal and running the command sudo apt-get install vlc.
Easy, right? But here’s the catch: the build of VLC media player available in Raspbian’s repositories lacks OpenMAX support, and it’s incapable of playing video properly. So close up Terminal and don’t enter that command above (if you already did, we’ll undo it in a second), because we have a better plan. Here’s how to compile VLC media player with hardware acceleration for the Raspberry Pi.
How to compile VLC media player with hardware acceleration for the Raspberry Pi
Thanks to a post on the Raspberry Pi Foundation’s message board, we have detailed instructions on how to easily compile VLC media player with hardware acceleration. For this project, you’ll just need a Raspberry Pi and the basic peripherals: a power source, screen, keyboard and mouse, and microSD card (you need all of this to get Raspbian installed in the first place, anyway).
Before we begin, a quick note for those of you who already have Raspbian and may have installed VLC media player from Raspbian’s repositories: I recommend that you remove that version. You can do so by running the command:
sudo apt-get purge vlc
Alright, let’s get started.
Step 1: Install Raspbian
If you don’t already have it, install Raspbian on your Raspberry Pi. Click that link for our complete guide.
Step 2: Download and extract VLC media player
Hop into Terminal and run the following commands:
cd Downloads
wget http://download.videolan.org/vlc/2.2.5.1/vlc-2.2.5.1.tar.xz
tar -xJf vlc-2.2.5.1.tar.xz
Now you have downloaded and extracted the latest version of VLC media player into your Downloads directory.
Step 3: Install dependencies
Next, let’s update the package list and install the needed dependencies. You might want to copy and paste the second command here, as it’s quite long:
sudo apt-get update
sudo apt-get install autopoint gettext liba52-0.7.4-dev libaa1-dev libasound2-dev libass-dev libavahi-client-dev libavc1394-dev libavcodec-dev libavformat-dev libbluray-dev libcaca-dev libcddb2-dev libcdio-dev libchromaprint-dev libdbus-1-dev libdc1394-22-dev libdca-dev libdirectfb-dev libdvbpsi-dev libdvdnav-dev libdvdread-dev libegl1-mesa-dev libfaad-dev libflac-dev libfluidsynth-dev libfreerdp-dev libfreetype6-dev libfribidi-dev libgl1-mesa-dev libgles1-mesa-dev libgles2-mesa-dev libgnutls28-dev libgtk2.0-dev libidn11-dev libiso9660-dev libjack-jackd2-dev libkate-dev liblircclient-dev liblivemedia-dev liblua5.2-dev libmad0-dev libmatroska-dev libmodplug-dev libmpcdec-dev libmpeg2-4-dev libmtp-dev libncursesw5-dev libnotify-dev libogg-dev libomxil-bellagio-dev libopus-dev libpng12-dev libpulse-dev libqt4-dev libraw1394-dev libresid-builder-dev librsvg2-dev libsamplerate0-dev libschroedinger-dev libsdl-image1.2-dev libsdl1.2-dev libshine-dev libshout3-dev libsidplay2-dev libsmbclient-dev libspeex-dev libspeexdsp-dev libssh2-1-dev libswscale-dev libtag1-dev libtheora-dev libtwolame-dev libudev-dev libupnp-dev libv4l-dev libva-dev libvcdinfo-dev libvdpau-dev libvncserver-dev libvorbis-dev libx11-dev libx264-dev libxcb-composite0-dev libxcb-keysyms1-dev libxcb-randr0-dev libxcb-shm0-dev libxcb-xv0-dev libxcb1-dev libxext-dev libxinerama-dev libxml2-dev libxpm-dev libzvbi-dev lua5.2 oss4-dev pkg-config zlib1g-dev libtool build-essential autoconf
Phew! Alright, we’re ready to compile.
Step 4: Compile VLC media player
Let’s hop into VLC media player’s directory and run some more commands. You may want to copy and paste again for the third one here:
cd vlc-2.2.5.1
./bootstrap
CFLAGS="-I/opt/vc/include/ -I/opt/vc/include/interface/vcos/pthreads -I/opt/vc/include/interface/vmcs_host/linux -I/opt/vc/include/interface/mmal -I/opt/vc/include/interface/vchiq_arm -I/opt/vc/include/IL -I/opt/vc/include/GLES2 -mfloat-abi=hard -mcpu=cortex-a7 -mfpu=neon-vfpv4" CXXFLAGS="-I/opt/vc/include/ -I/opt/vc/include/interface/vcos/pthreads -I/opt/vc/include/interface/vmcs_host/linux -I/opt/vc/include/interface/mmal -I/opt/vc/include/interface/vchiq_arm -I/opt/vc/include/IL -mfloat-abi=hard -I/opt/vc/include/GLES2 -mcpu=cortex-a7 -mfpu=neon-vfpv4" LDFLAGS="-L/opt/vc/lib" ./configure --prefix=/usr --enable-omxil --enable-omxil-vout --enable-rpi-omxil --disable-mmal-codec --disable-mmal-vout --enable-gles2
And then another command, which, mercifully, is a short one:
make -j3
Be prepared to wait something like 20-25 minutes.
If the process goes through, you will have successfully compiled VLC media player. The last command in our instructions installs the binaries from the building process and copies them to appropriate locations:
sudo make install
Step 5: Change settings
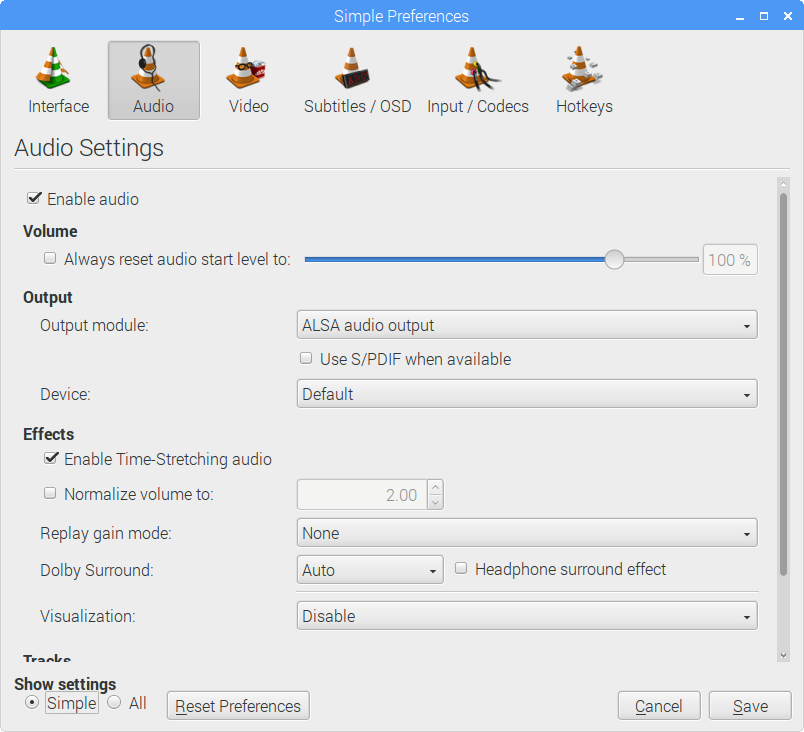
You’ve now compiled and installed VLC media player. You can start the program via the menu bar (Sound & Video > VLC media player) or Terminal (with the command vlc). After starting the program, open the settings dialog and change your settings (Tools > Preferences) so that they look like this:
Audio
Output module: ALSA audio output
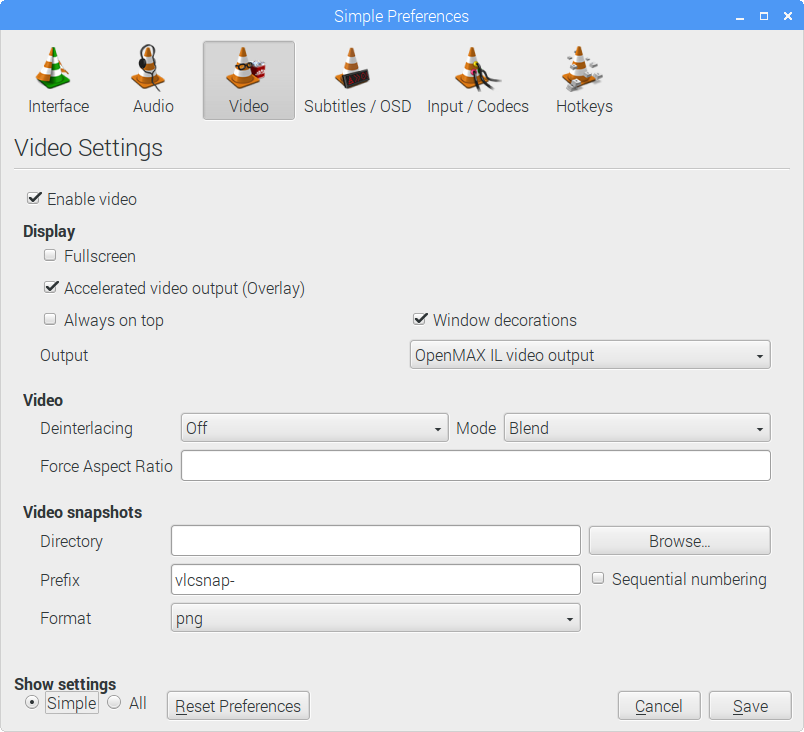
Video
Output: OpenMAX IL video output
When you play something, you’ll notice that the video plays in an overlay and not inside a window. You can only control the playback using your keyboard, so I would encourage you to learn some basic hot keys (for example, CTRL+Q for quitting).
Step 6: Send the audio out over your HDMI connection (optional)
There’s one more thing that you may want to tweak here before we’re done. At this point, VLC media player will send audio out through your Raspberry Pi’s headphone jack only, meaning you’ll have to plug in headphones, an auxiliary cord to your stereo system, or standalone speakers in order to hear your videos. That works out for some users, but others may want to push the audio out the HDMI port.
To do that, open Terminal and run the command sudo raspi-config. In the resulting menu, navigate to Advanced Options > A4 Audio > Choose the audio output: 2 Force HDMI.
And that’s it! We’re done here. You now have a functioning version of VLC media player, and can push the audio out of either your headphone jack or HDMI port at will. If you ever want to remove VLC media player, you can do so by running the following command inside your VLC directory:
sudo make uninstall
Now go forth and enjoy your videos!
Hey, I get 4:3 overlay, do you know where to change that option?
I can’t get this to work. I copy-pasted the apt-get install part, which told me some packages were not installed. I tried proceeding, but it didn’t work. I then typed in the missing installations, and this time bootstrapping was successful. Running the CFLAGS returned a number of configure warnings, in particular that lua was not found.
As of right now, it’s wget http://download.videolan.org/vlc/2.2.6/vlc-2.2.6.tar.xz
While installing packages, there is a problem with libpng12-dev. Many packages work with libpng-dev, so they remove libpng12-dev and install libpng-dev instead. While running the command at Step 3, an error occurs if libpng12-dev is not removed from the list of dependencies. This happens on Raspbian Stretch.
Also on Raspbian Stretch there is a problem at Step 4 because libavutil version is 55 and should be earlier. I solved this by reinstalling an earlier version of ffmpeg (2.7.7 Nash).
Following the steps above on Raspbian Stretch … along with the suggestions from Thibaut …
the compile goes through (no errors) as well as the install but the OpenMAX IL does not appear in the video output list … any idea ?
Thibaut…. Did you have to remove ffmpeg before “reinstalling an earlier version of ffmpeg (2.7.7 Nash)”?
Thibaut: What is the process to reinstall earlier version of FFmpeg?
Back on 12 October, the author of the previous notes created a new one that explains how to build for Stretch, which is of course the most recent version of Raspbian. If you are running Stretch, you will want to follow this newer note:
https://www.raspberrypi.org/forums/viewtopic.php?f=66&t=195221
Why don’t you download the source from the repository, and recompile it there, with the needed changes? Then a simple patch is all what is needed.
apt-get sources vlc
Would get the sources, and then you would make a Debian package to install over the old one.
Yes, it is a bit more to do, but not as much. And the patch could be sent upstream to make it into next versions.
Finally a guide that works, thank you!
That was quite exhaustive. Haha! I think, you may have to add “required time” in posts like this. Took well over 2 hours for me.
I got so far as
make -j3
and got following error message
make: *** No targets specified and no makefile found. Stop.
Help anyone.
Daniel, that error message usually means that one is not CD-ed to the correct working directory. You should be in the top level of the directory structure that you un-tarred.
Either that or the bootstrap process did not complete correctly, since that’s probably what is supposed to create the makefile.
I’m getting same error after ‘make -j3’.