You have a lot of options when it comes to installing an operating system on your Raspberry Pi. To that list, add relative newcomer DietPi – a Debian GNU/Linux spin-off that, as the name suggests, doesn’t have a bit of fat on it. DietPi is even slimmer than Raspbian Lite, and it’s optimized to tax your Pi’s hardware as little as possible. But DietPi packs a punch despite its light weight: it comes with ready-to-run software, including a ton of popular programs. Here’s what you need to know.
What is DietPi?
Like Raspbian, DietPi is a Debian-based operating system designed for the Raspberry Pi. But while Raspbian is focused on bringing as many of Debian’s comforts to your Pi as possible, DietPi is focused on cutting the fat to give you a sleek and lightweight OS that can still do some heavy lifting.
Just how light is DietPi? Its images start at 400 MB, which, DietPi’s website brags, is three times smaller than Raspbian Lite. That’s not three times smaller than Raspbian – it’s three times smaller than Raspbian Lite. Things don’t get much skinnier than that.
And DietPi comes with read-to-run software, as I mentioned in the introduction. The list of included software features some of our old favorites, including media centers like Kodi and Emby, torrent clients, cloud backup systems like ownCloud, and even support for WordPress, which is the content management system we use to write The Pi!
Yes, there’s a lot to love about DietPi. In fact, the only thing not to like is that really dumb Donnie Darko-inspired logo it’s got. But forget about that – do you want to learn how to install this bad boy?
How to install DietPi on your Raspberry Pi
Okay, so now that I’ve sang the praises of this slim operating system, I guess I’d better show you how to install it. You’ll need a Raspberry Pi, of course, and the basic peripherals (a screen, a power source, and a keyboard and mouse wouldn’t hurt), plus a microSD card. You don’t need a real big one, because DietPi is so small, but it never hurts to grab 8 gigs or so and have the extra room if you need it.
Step 1: Download the right disk image

Head over to http://dietpi.com/ and click on the “Download” tab. You’ll see a nice visual menu with photos of various supported devices – you’ll want the Raspberry Pi, of course. Go ahead and download the disk image.
Step 2: Unzip the disk image
Your download will be the .7z format. If you’re familiar with unzipping weird files, you may guess the solution here: 7zip, of course. If you don’t yet have 7zip, you can get it here. Then use 7zip to unzip the disk image.
Step 3: Write the disk image to your microSD card
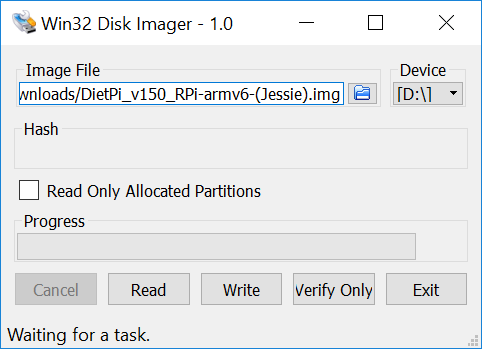
At this point, the process should start feeling familiar to those of you who have installed Raspbian and other operating systems on your Raspberry Pis before. We’ll use the same programs we recommended for Raspbian – that’s the Disk Utility for you Mac users and Win32 Disk Imager for you PC fans.
Step 4: Put it all together
Once the disk image has been written to the micro SD card, you’re ready to go! Put the microSD card into your Pi, attach your peripherals, and plug in your Pi’s power source.
What you can do with your DietPi device
So there you have it: you’re now in possession of a fully functioning DietPi device. So what can you do? Well, you can start by installing some of those ready-to-run programs that we were talking about before. Here’s how you do it:
In the command line, type:
dietpi-launcher
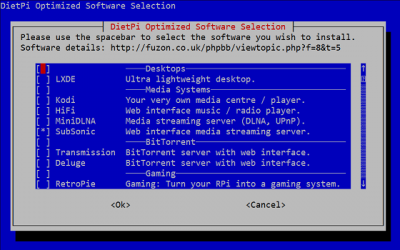
(You can also type dietpi-software.) You’ll get a screen that looks like this:

It’s pretty self-explanatory from here, but it should be noted that some of your options may be disabled because they can’t run on your Raspberry Pi. You can get a full list of what is disabled by running the command dietpi-software list | grep disabled.
As you’ll be able to see, the list of programs that you can install is incredibly long. You can find the full list over on the DietPi message boards, along with tips for firing up each and every one of them. We’ll be using some of these in future how-tos, so if you like DietPi, stay tuned to The Pi!


Be the first to comment on "How to use DietPi on the Raspberry Pi"