Here at The Pi, we’ve shown you how to do a ton of cool software projects. We showed you how to set up a Raspberry Pi Plex server, how to watch Netflix on the Raspberry Pi, and so much more. But, until now, we haven’t done much with add-on hardware. Let’s change that. Today, we are going to do something more hardware-oriented: we are going to show you how to set up a Raspberry Pi weather station that can be accessed over the internet.
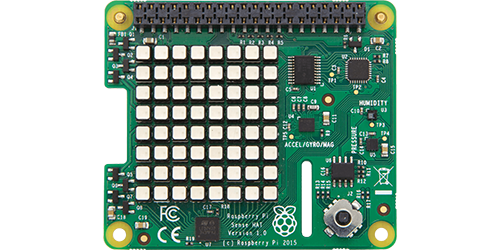
For this, we need the Sense HAT, a Raspberry Pi add-on board that was made especially for the Astro Pi mission. The Astro Pi mission sent two Raspberry Pis (each equipped with a Sense HAT and a few other improvements) to the International Space Station, where they joined British astronaut Tim Peake and helped record information about environmental conditions up there in the space ship.
We won’t be launching our Raspberry Pis into space for this project (sadly), but we can take advantage of the Sense HAT’s capabilities to do some cool stuff here on Earth. To record all that environmental information, the Sense HAT was designed with a number of sensors that can detect things like temperature.
You probably have a thermometer at home, so you don’t need a Sense HAT to know the temperature when you’re there. But with the Raspberry Pi and the Sense HAT working together, we can put this information online – giving your home a new smart feature.
How to set up a Raspberry Pi weather station using the Sense HAT
We already discussed the Sense HAT, and you probably figured out that you’ll need a Raspberry Pi (and the typical peripherals). All we need besides these things is a simple web server, so that our Raspberry Pi weather station can be accessed over the internet. We are going to use Flask, a Python microframework that can be used to build web servers and create web applications. Let’s get started.
Step 1: Install Raspbian and check for updates
Like many projects, this one starts with Raspbian. Learn how to install it here. As always, the first thing to do is to make sure that our Raspberry Pi is up to date:
sudo apt-get update
sudo apt-get upgrade
Step 2: Install the needed packages
Actually, the packages we need should be installed by default – but it doesn’t hurt to run these commands and make sure.
sudo apt-get install python3-flask
sudo apt-get install sense-hat
You’ll probably a message like this after the first command:
python3-flask is already the newest version.
And, similarly, after the second:
sense-hat is already the newest version.
If so, great – it means we’re good to go.
Step 3: Build a web app and web server
In this step, we’re building a Python-powered web app and a Python-powered web server using Flask. This may sound a bit arduous, but it’s actually very easy.
First, let’s create a new Python file and add some lines in it. This command creates the file:
nano weather.py
You’ll be in your new file now. But there’s nothing in it yet, of course. Fill it up with the following text:
from flask import Flask, render_template
from sense_hat import SenseHat

app = Flask(__name__)

@app.route('/')

def index():
    sense = SenseHat()

    celcius = round(sense.get_temperature(), 1)
    fahrenheit = round(1.8 * celcius + 32, 1)

    return render_template('weather.html', celcius=celcius, fahrenheit=fahrenheit)

if __name__ == '__main__':
    app.run(debug=True, host='0.0.0.0')
Hit Ctrl+X to exit the file, hit Y to agree to save it, and hit Enter to keep the same filename that you just gave it.
Now, we need to create a simple HTML template for the Python file we created. Let’s create a folder and then a new .html file.
mkdir templates
nano templates/weather.html
Here’s the contents of the template I used:
<!doctype html>

<html>
    <head>
        <title>Raspberry Pi Weather Station</title>
    </head>

   <body>
        <h1>Raspberry Pi Weather Station</h1>

        <h2>Temperature</h2>
        <p><strong>Celcius:</strong> {{ celcius }}</p>
        <p><strong>Fahrenheit:</strong> {{ fahrenheit }}</p>
    </body>
</html>
You can tweak yours to give it a different look, of course.
Now, we can launch our web server and app by typing:
python3 weather.py
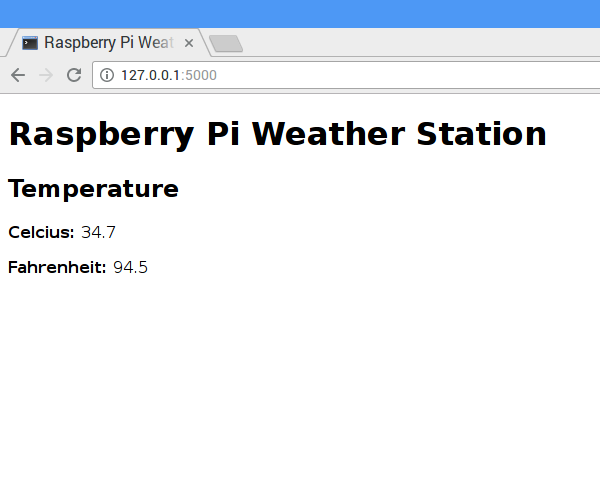
Now that it’s up and running, you should be able to type 127.0.0.1 (the localhost IP) into the address bar in your Pi’s browser and see your site. Here’s what mine looked like:
Step 4: Add humidity and air pressure
If you’re happy with just temperature, we’re all set here. But the Sense HAT can give you more information, including humidity and air pressure. Let’s modify our weather station to display them as well. First, we need to exit our app, though, by pressing Ctrl+C.
Now that you’re out, type:
nano weather.py
This is our Python file from Step 3, of course.
Below the line fahrenheit = round(1.8 * celcius + 32, 1), add the following lines:
humidity = round(sense.get_humidity(), 1)
pressure = round(sense.get_pressure(), 1)
Then, edit the return line like this:
return render_template('weather.html', celcius=celcius, fahrenheit=fahrenheit, humidity=humidity, pressure=pressure)
Finally, we need to modify our HTML template. Let’s go back to that file:
nano templates/weather.html
..and make it look like this:
<!doctype html>

<html>
    <head>
        <title>Raspberry Pi Weather Station</title>
    </head>

    <body>
        <h1>Raspberry Pi Weather Station</h1>

        <h2>Temperature</h2>
        <p><strong>Celcius:</strong> {{ celcius }}</p>
        <p><strong>Fahrenheit:</strong> {{ fahrenheit }}</p>

        <h2>Humidity</h2>
        <p>{{ humidity }}</p>

        <h2>Pressure</h2>
        <p>{{ pressure }}</p>
    </body>
 </html>
Again, feel free to tweak the look of your personal site.
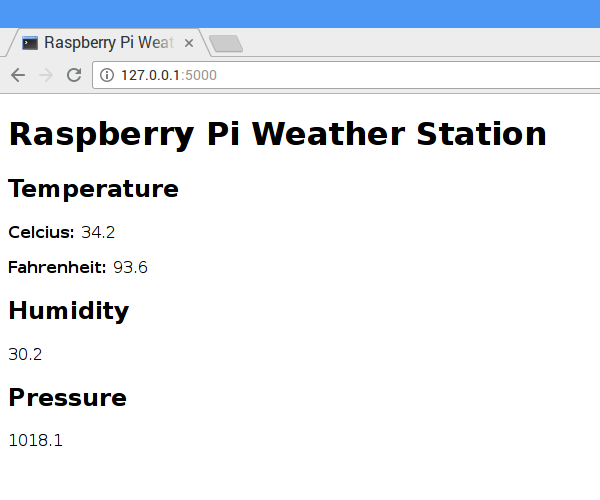
Now put 127.0.0.1 into the address bar in your Raspberry Pi’s web browser again and enjoy your new and improved site! Mine looks like this:
Step 5: Set up port forwarding
Alright, the weather station is working, but it’s only available from within the home network. For example, if your smart phone is connected to the same network than your Raspberry Pi, you can browse to the Raspberry Pi’s IP address followed by :5000 (for example, http://192.168.0.101:5000) and see the same page (you can obtain your Pi’s IP address by typing hostname –I in Terminal).
However, you can’t open the page from outside your home network – yet. To be able to do so, you’ll need to set up port forwarding in your router’s admin interface. Access your router’s admin interface by typing in your router’s IP address and entering any necessary login information (this information is often printed on a sticker on your router). Then set up your port forwarding settings like so:
Service Port: 80
Internal Port: 5000
IP Address: [your Pi's IP address]
Protocol: TCP
Yours may be presented in a different format or a different order, but you’ll want the same values in each spot.
Now that you’ve done this, hop on a device that’s outside your network and enter your network’s public IP address (you can obtain your public IP address by Googling “what’s my IP address”). You should be redirected to your weather station site. Congratulations – you’ve set up a Raspberry Pi weather station using the Sense HAT!

Question: Won’t the reported temperature be more influenced by the heat radiated from the Pi that by the ambient temperature in the home?
Very nice project. I like it. Since I would have to pay extra money to my internet provider to host a web server, it would be nice to have instructions on how to upload the data periodically to Dropbox, Google Drive or similar instead. Uploading data to Weather Underground is another option.
Traceback (most recent call last):
File “/home/pi/.local/lib/python3.5/site-packages/numpy/core/__init__.py”, line 16, in
from . import multiarray
ImportError: libf77blas.so.3: cannot open shared object file: No such file or directory
thanks for the quick write up. It’s very useful for a beginner like myself. There is a minor typo in the statement below. Fahrenheit should be lower case.
return render_template(‘weather.html’, celcius=celcius, fahrenheit=Fahrenheit, humidity=humidity, pressure=pressure)
should be
return render_template(‘weather.html’, celcius=celcius, fahrenheit=fahrenheit, humidity=humidity, pressure=pressure)
Thanks for catching!